Working with AWS EC2 Instance Store Volumes
As you know, there are two main EC2 Block Store Devices in AWS.
- EBS backed EC2 instances
- Instance Store backed EC2 instances
Out of these two, AWS recommends EBS backed EC2 instances mainly because they are persistent and more resilient compared to Instance Store EC2 instances.

The figure 01 explains how Instance Store volumes and EBS volumes are configured with an EC2 host. Instance Store volumes are residing within an EC2 host and EBS volumes are stored outside of it. Hence, even if you stop or shutdown an EC2 instance, EBS can persist your data without any problem.
Creating an EC2 instance with Instance Store Volumes
The following steps will primarily showcase the Instance Store’s inability to keep the persistence especially in an instance shutting down.
- Go to EC2 Dashboard
2. Click “Launch Instance” button
3. Select AMI “Amazon Linux 2 AMI (HVM), SSD Volume Type” and click “Next”
4. Choose Instance Type “m5d.large” and click “Next”
5. Select all the default values and click “Next”

6. Select Storage Types that are already selected by default and click “Next” (See Figure 02 — You can see both “root” and ephemeral (Instance Store) volumes, which are added by default to this instance).
7. Add a key-value pair as tags and click “Next”
8. Configure the Security group and click “Next”
9. Click “Review and Launch”
10. Now SSH into the created EC2 instance from your local machine
11. Execute the following commands within the EC2 instance.
First, see the file system of the EC2 instance (See Figure 03). You can see “root” volume (/dev/nvme0n1p1) is attached to it. However, you cannot see the Instance Store volume in this.
$ df -h

Now list all the block device details of the instance. Now you can see the Instance Store volume (nvme1n1) with this (See Figure 04). However the Instance Store is not mounted to any file system so far.
$ lsblk

If we are to mount the Instance Store volume manually, we need to follow the steps below.
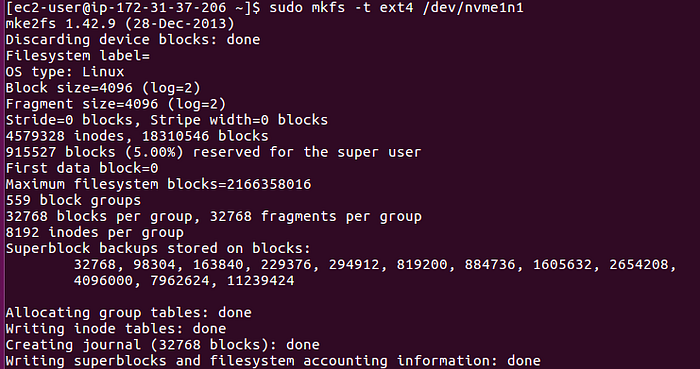
Format the new Instance Store volume, since it is not formatted so far and it is new (See Figure 05).
$ sudo mkfs -t ext4 /dev/nvme1n1
Create a directory(“crish”) that you are going to mount to the Instance Store volume, First of all you need to create this directory in the boot volume.
$ mkdir crish
Mount this folder (“crish”) to the Instance Store volume now.
$ sudo mount /dev/nvme1n1 crish
Now you can again check the block device details to see the mount points (See Figure 06).
$ lsblk
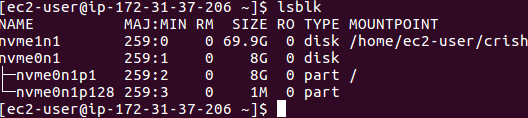
Now you can see that the “crish” directory is now attached to the Instance Store volume.
Once the directory is mounted, you can create some dummy files (crish.txt) within the “crish” folder.
$ sudo vi crish.txt
P.Note: The above text file (crish.txt) is created within the mount folder (“crish”) within Instance Store volume and not in the boot volume.
The configurations are over now. You can now test the behavior of Instance Store volumes by executing two use cases.
- Use Case 01: By rebooting the EC2 instance.
- Use Case 02: By restarting (stop and start) the EC2 instance.
Use Case 01
Rebooting the EC2 instance.
$ sudo reboot
Log back again via SSH and mount the “crish” folder again as you did before. Now see whether you could see the text file within the mounted folder (“crish”). If you were able to execute above steps properly, you should be able to see the text file within the folder.
Conclusion: EC2 instance reboot is just a OS restart and has nothing to do with the host, where EC2 instance is resided.
Use Case 02
Restarting the EC2 instance.
Now, SSH to the instance and try to mount the mount folder (“crish”) again. As expected, you should get an error message
“wrong fs type, bad option, bad superblock on /dev/nvme1n1, missing code page or helper program, or other error”.
This means you are required to format the Instance Store again. That clearly shows that you have been given a fresh Instance Store instance for your use.
Conclusion: When you restart the EC2 instance, the host goes down along with Instance Store and allocate a new host for the EC2 instance setup again. That is the reason why you need to format the Instance Store volume again.