The workforce identity management using AWS SSO
AWS Identity Management Advanced Series — Part 2
This blog is the part 02 of my AWS Identity Management Advanced Series. In part 01, I discussed about how we can leverage SAML 2.0 federated systems with AWS. This article is primarily focusing on the AWS Single Sign On (SSO) service, which is now known as the de-facto “workforce identity management” service in AWS.
Workforce Identity Management
Workforce Identity Management is all about use of the identity and access management capabilities to internal organizational users to access organizational resources.
Why AWS SSO?
- Significantly reduces the configuration overheads compared to the the traditional SAML 2.0 implementations
- Centrally manages the SSO access and permissions for all of your AWS accounts managed under an AWS Organization.
- Provides access to external business applications as well.
AWS SSO vs SAML 2.0 Federation
In the traditional SAML 2.0 identity federation, we do configure federation manually due to the fact that different SAML 2.0 identity providers have their own configurations. With AWS SSO, these configurations are abstracted to have a common service by maintaining a flexible identity store within AWS.
AWS SSO Key Features
- AWS SSO User Portal — Users can easily find and access all applications and AWS accounts, which are part of AWS SSO.
- Integrated with AWS SSO — Integrated with AWS organization to enable you to manage access to all AWS accounts in your organization.
- Integrated with on-premise Active Directory (AD) — Integrates with your on-premise AD by using AWS Directory Service
- Centralized permission management — Centrally manages permissions with the help of permission sets.
- AWS SSO Configuration wizard — Nicely built configuration wizard allows you to configure easily
- Built-in SSO Configurations — Provides some of the built-in configurations for external business applications such as Office 365 and Salesforce
- Centralized Auditing — Integrated CloudTrail allows for more details auditing
- Highly available multi-tenant infrastructure
Lets Test it!
Lets now simulate a scenario with multiple AWS accounts configured under an AWS organization. All these AWS accounts are easily configured through AWS SSO for seamless access (See Figure 1).

Prerequisites
- Login as an AWS management / master account
- Select N.Virginia (us-east-1) as the AWS region
Task 1: Enabling the SSO
- Search for SSO from the search bar.
- Click “Enable SSO” link to enable SSO within your management account. (It will take about 30 sec to enable it)
- Once enabled, you will be directed to the AWS SSO Dashboard.
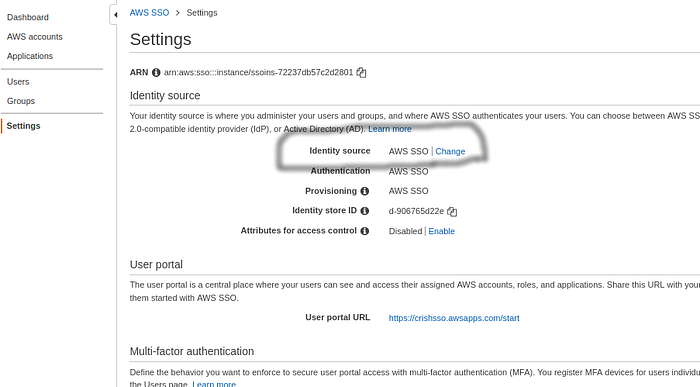
Task 2: Choose the identity source
- Click the link “Choose your Identity Source”
- Under “Identity Source” by default “AWS SSO” is selected. However by clicking the “Change” link you will be able to change the source (AWS SSO / active Directory / External Identity Provider) — See Figure 2 and 3.

Task 3: Change the “User Portal URL” to have a more meaningful one.
You may change the “User Portal URL” as shown in See Figure 4.
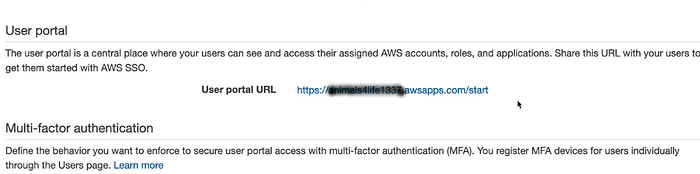
If you had done any changes, you may click “Save Changes” button.
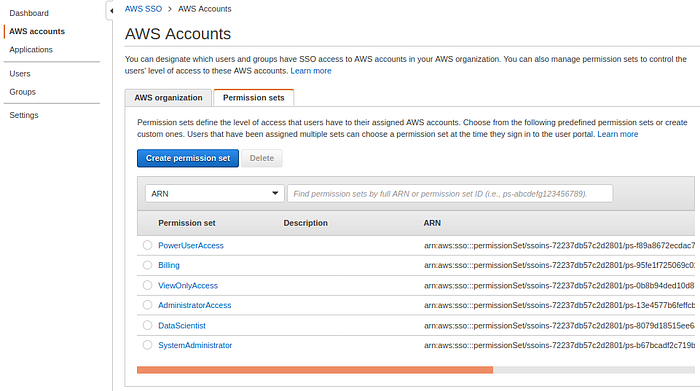
Task 4: Create Permission Sets
1. Click the “AWS Accounts” link on the left navigation → Select the “Permission Sets” tab to add a few predefined permission sets.
2. Click “Create Permission Sets” button → Select “Use an existing function policy” → Select “Job function policy” and select a policy and confirm it. The selected policy will be added as a permission set. Likewise, you can continue adding required permission sets to the same page (See Figure 5).
Task 5: Add a user and a group
1. Click “Users” link on the left navigation → Click “Add User” button → Enter user details → Click “Next” → Create a Group (e.g.. “Engineering”) and select the check box and click “Next” → Finally, click “Add User” button
The above will create a SSO user and a group which is assigned to the created user.
You are required to confirm the email by log in to your email. That would prompt you to a fresh password and allow the new user to log in to the AWS SSO console.
Now, you can try the User Portal URL (I.e also to log in to the system using the user credentials that you created above.
Task 6: Add permissions to the user
1. Click “AWS Accounts” on the left navigation
2. Under the “AWS Organizations” tab, select (by checking the check boxes) all the AWS accounts under the member account.
3. Once select all the AWS accounts, click “Assign Users” button.
4. Then rather selecting “Users” tab, select the “Groups” tab
5. Select the group that you created under Task 5 (e.g. “Engineering”) and proceed.
6. You may select the relevant permission sets for the user group selected and click “Next”
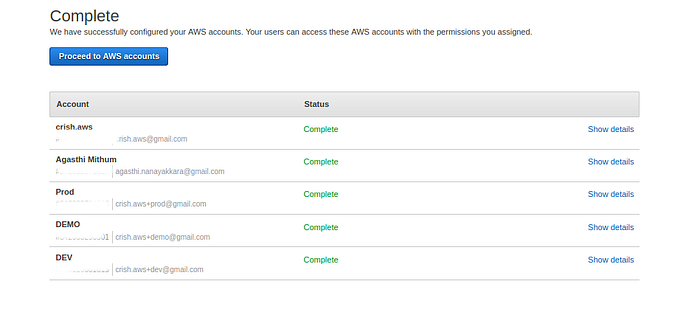
This process will assign relevant permissions and roles for all AWS accounts for the user selected.
Once the above is completed, you would see a page like below (See Figure 6).
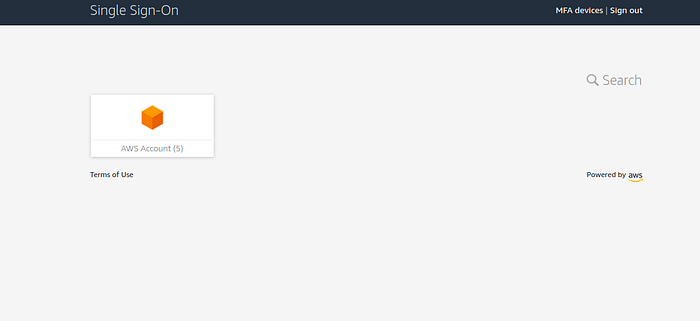
Task 7: Sign in to AWS SSO User Portal
Once the user creation and the permission setting is done, you may use the “User Portal URL” to sign in the AWS SSO user portal (See Figure 7). You may use AWS SSO user credentials that you have created under Task 5.

Once you log in, you will see the AWS SSO user portal dashboard with access links to all AWS accounts that you assigned the user to (See Figure 8).
Once clicked a particular AWS account, you will see links for each permission you added for each AWS account (See Figure 9).
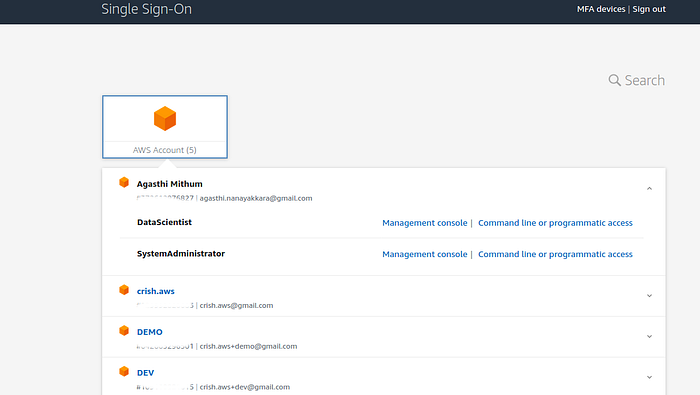
By clicking the “AWS Management Console link” under a particular AWS account, you will be forwarded to the particular AWS account seamless manner. This is so cool!.
Conclusion
If you had experienced SAML 2.0 manual configuration to AWS prior AWS SSO introduction, you will definitely value the feature set, which is provided to the end user. I am sure there can be many additional features, which can be incorporated to this service, but it is certainly a great addition to AWS identity integration platform.
References
- Introducing AWS Single Sign On: https://aws.amazon.com/blogs/security/introducing-aws-single-sign-on/
2. How to create and manage users within AWS SSO: https://aws.amazon.com/blogs/security/how-to-create-and-manage-users-within-aws-sso/
3. Managing the multi-account environment using AWS Organizations and AWS Control Tower: https://aws.amazon.com/blogs/mt/managing-the-multi-account-environment-using-aws-organizations-and-aws-control-tower/
4. How to Connect Your On-Premises Active Directory to AWS Using AD Connector: https://aws.amazon.com/blogs/security/how-to-connect-your-on-premises-active-directory-to-aws-using-ad-connector/
5. AWS Directory Service extend on-premises Microsoft AD to AWS Cloud using AWS Managed Microsoft AD: https://www.youtube.com/watch?v=iLxc8XaMpno
6. Managed User Access to Multiple AWS Accounts using AWS SSO: https://www.youtube.com/watch?v=bXrsUEI1V38